Okay, so recently I found out about locking transparent pixels, a feature in photoshop that allows you to change the color of your linework very easily.
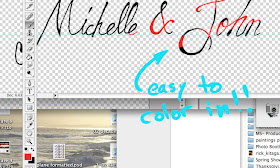
So the screencap below is some calligraphy-ish type lettering I did for my friends' wedding invitations that I'm working on. However, they're not too keen on just black lettering, as it doesn't go with the rest of the color scheme, so I needed to change the color. Rather than go and repaint the lettering with a new color (and what if the color wasn't right?), I decided to try out this new (at least to me, PS noob) feature.
 So as you can see (if you click on the image to see a larger version), I've circled the toggle button for the "lock transparent pixels" feature. Basically, what you are doing is that for whatever layer you are editing, you are making it so you can only edit the pixels that already have information in them. You can now no longer paint where it's transparent (until you unlock the transparent pixels). This lets you freely color in the pixels that have information (ie. your line work).
  You can see in the above screencap that I'm now just using the brush tool to quickly swipe in color..I'm replacing the black with red.
 Other applications for this would be when you are digitally painting and you are working in many layers. Say you are painting someone's face on a single layer. You've got the proportions down and you want to quickly replace some color on the edge of the face. Instead of carefully filling in color over your painting, if the background is transparent then you can lock the transparent pixels and then just paint away!
Anyhoo, I hope this helps a bit (it's really useful for logos!) and feel free to leave questions/comments/clarifications in the comments! Thanks for stopping by!

No comments:
Post a Comment